How to Select a Projector Ceiling Mount


Where to Put the New Projector
Now that you've finally purchased that projector you've been looking for, you're excited and ready to start enjoying the benefits of your new projector. But wait, where do you put it?
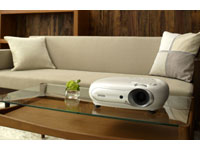
Does a projector belong on the coffee table or the ceiling?
You want it positioned perfectly to view on your projection screen without obstructing the view of the watching audience. You could always place the projector on the coffee table in front of the couch. However, the projector might clash with the interior decorations of the room and become quite an eyesore.
Also, placing the projector on the coffee table could be unsafe for the projector. Someone could spill a drink or trip over the cables. Keeping the projector out of harm's way is not only good for your projector, but also good for your family and friends. The ideal way of doing this is by mounting your projector to the ceiling.
Projector Mount Homework
Using a mount to install a projector on the ceiling is quick and easy. It is also easy to go out and get a ceiling mount. Here are some tips to consider when purchasing a projector ceiling mount.
- Projector Weight: Select a projector mount with sufficient weight capacity.
- Ceiling Type: Choose the right installation hardware for the ceiling material (drywall screws, extension columns, drop ceiling kit, who knows).
- Projector Orientation: (inverted vs. right side up). Check to see if your projector works upside down to be compatible with the lowest price mounts.
- Choose between a Universal and a Dedicated mount. Universal: versatile/time consuming install. Dedicated: unique/quick install. Measure twice. Drill the holes into your ceiling once!

Where to Install the Mount - The Perfect Spot
You will need to determine the location on your ceiling to mount the projector. To do this simply grab your projector and adjust the zoom to the middle position. Then size the projector image up on your screen.
One way to size up a projector image is to point the image at the screen and move the projector forward or backward. Stop when the projector image fits the screen.
Now you have a starting location for mounting your projector. You will want to position the location even with the center of your projector screen. Based on this central location, find your nearest stud in the ceiling. Once you have established a stud to mount onto, grab your projector once again and double check your positioning.
Special Note on Ceiling Type - Accessories and Finishing Touches
Ideally you will want to keep your projector even with the top of the screen. This can be manipulated +/- 20 degrees depending on the mount you purchase. If your ceiling is much higher than the top of your screen there are many lengths of extension pipes and ceiling adapters to overcome that issue. If your ceiling is slanted you would need to buy a cathedral ceiling adapter and the appropriate extension pipe.
Most ceiling mount kits include the necessary hardware to mount to drywall and related ceiling materials. For special installations, screws and anchors for mounting to other materials such as brick and metal are available.
Projector Ceiling Mount Finishing Kits Look Professional

In offices and classrooms with drop ceilings, a combination of metal fasteners, extension column and a panel to mask where the projector comes through the drop ceiling contribute toward a professionally finished look. Drop ceiling kits are completely optional though. At any point during or after the installation, you can always buy an escotchen ring to go around your extension pipe, giving your installation a clean look.
Thankfully, most ceilings are made to be strong enough to hold heavy objects hanging from them such as fans and light fixtures. Therefore a projector and mount should not pose a problem.
How to Install the Mount - Orientation
One thing you will notice about mounting a projector is that the projector has to be inverted (upside down). Why inverted you're wondering? Projectors when sitting upright project upward at a 45 degree angle, so in order to ceiling mount the projector you have to invert it. Plus, if the projector was right side up in the ceiling, and you lose the remote for your projector or the remote breaks, you would not be able to access the controls on the projector.
By inverting the projector and mounting it by its underside, you're still able to easily access the power button and other key function buttons of the projector. If an inverted orientation is not going to work for your projector, wall bracket mounts are available. . . or perhaps there is space on the coffee table.
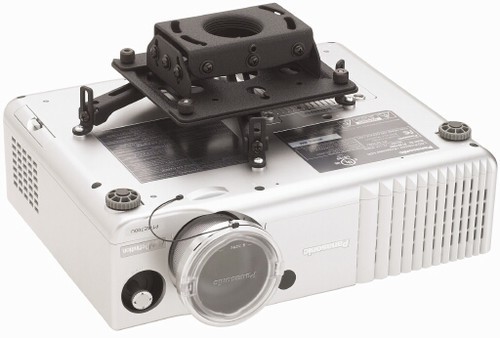
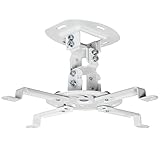
Universal Mount

Dedicated Mount

Which Mount Type - Universal or Dedicated
When purchasing a mount you'll come across universal and dedicated mounts. Essentially the functionality is the same. Both Dedicated and Universal mounts safely hold a projector to the ceiling.
Dedicated mounts are made with a pattern of screw holes drilled into the mount that line up directly with specific projector model's pattern of screw holes.
Universal mounts are designed so that users can move the screw holes to match the unique mounting pattern on each projector. With the universal mounts you have to line up the arm extensions to the screw holes. The arm extensions make the universal projector mount look like a spider.
The benefit of the universal projector mount is that if you ever purchase another projector down the road you will not have to replace the mount. When purchasing a ceiling mount for your projector, be sure that you research the way each particular mount attaches to the ceiling, and the projector itself, to be sure you have the right one to fit your application.
Now that you've reviewed the basics for mounting your projector to the ceiling follow your projector mount instructions and always double check your measurements before drilling into your ceiling.
Good luck with your project!

 Resolutions - What Does Resolution, Aspect Ratio, ppi Mean For Your Smartphone, Tablet, TV, or Monitor")
